Treasured by Holly

Perfect Gift, Perfect Price!

Holly Pitcher1 Comment

I am so excited to be teaming up with Simplicity Creative Group and Jo-Ann Craft Stores to help spread the work about one of their amazing Black Friday Promotions...The Boye Loom Value Kit.

The Boye Loom is seriously the secret to super-easy knitting and creating simple, fun projects with ease! You can make hats, boot cuffs, pom pom, flowers, scarves and more with this easy-to-use loom kit without any knitting experience. Which makes it the perfect gift for kids, teens or anyone who has wanted to learn how to knit easily with a loom and a hook.

This amazing $24.99 Door Buster Deal is valid 11/24- 11/27/15 and includes:

  • 9 Round and Oval Looms

  • Pom Pom Maker

  • 2 Metal Hooks

  • 2 Plastic Needles

  • Instructional DVD and Booklet

  • 17 Knitting Projects

Over 60% off -MSRP $75 and is available in store and online.


This is such a great gift for everyone on your list! And what makes this complete is @BoyeYarnCrafts has generously provided me the cutest loom pattern to share with all of you. Christmas just isn't complete without a little elf beanie, am I right? In getting started I was amazed with how much you can do with the looms. The possibilities are endless for sure! 

I must say that switching looms in this pattern was a bit tricky, but once I got the hang of it the change to the 12 peg was super slick. I changed the pattern up a bit since I chose to use super bulky yarn. I didn't repeat round 15 and then I fastened off. Then I did my signature braided tail and then followed round 25 for the pompom. 

All in all I really loved working with the loom. The best part was when I finished my project my cute kiddos took right over and have been looming it up. That is such a bonus in my book!! 


Baby's Elf Hat with Pompom

DISCLAIMER

The Boye Loom Kit Doorbuster price of $24.99 is valid from Tuesday, 11/24/15 through Friday, 11/27/15 then returns to a retail price of $39.99. Visit in store and online for full product and price details.

Halloween Inspired "Sophia" Flower Clip Pattern

Holly Pitcher1 Comment

I can't believe that Halloween is almost upon us. Seriously, where does the time go? I must say, however, that this is one of my most favorite holidays for so many reasons. One being the candy, of course. The other, all the fun parties throughout the month. When my girls were younger (and will still let me do whatever I wanted with their hair and clothes) I would buy fun Halloween shirts and make hair accessories to match. 

sophiaflowerjaynaTBH

Isn't she the cutest!! She was only 4 in this picture and oh how I miss her sweet little voice. Now she's 10 1/2 and so full of wonderful energy. I just love her. Here's wishing you a haunting halloween and have fun with this little flower!


Pattern

SKILL LEVEL: Beginner/Intermediate

CROCHET HOOK: Size F Boye crochet hook (to make smaller flower use smaller hook size)

SIZE: One size fits all

With F hook and 1st desired flower color.

Rnd 1: Magic ring

Rnd 2: 10 sc’s in the middle of the circle.  Slst to join. See image 1

Rnd 3: Ch 4, slst in the second crochet loop, *ch 4, skip one stitch , slst in next crochet loop* repeat between *’s around. (5 - ch4 loops made) See image 2

Rnd 4: Work the following stitches (sc, hdc, 3dc’s, hdc, sc) all in the first ch4 loop. Repeat between ( ) around. (5 petals made) See image 3

Rnd 5: Ch 5, slst between the first and second petals (see pictures for reference) *ch5, slst between the next two petals* repeat between *’s around. (5 - ch5 loops) See image 4

Rnd 6: Join second color into first ch5 loop. See image 4. Work the following stitches (sc, hdc, 5dc’s, hdc, sc) all in the first ch5 loop. Repeat between ( ) around. (5 petals made) See images 5-7

Rnd 7: Ch 6, slst between the first and second petals (see pictures for reference) *ch6, slst between the next two petals* repeat between *’s around. (5 - ch6 loops) See image 8

Rnd 8: Join third color into 1st ch6 loop. Work the following stitches (sc, hdc, 7dc’s, hdc, sc) all in the first ch6 loop. Repeat between ( ) around. (5 petals made) Fasten off leaving about a 36" tail to complete Rnd 9 with. Fasten off and weave in all ends except 36" tail. See images 9-16

Rnd 9: With a large-Eye Blunt Needle weave Rnd 5 tail through flower till center is reached, draw needle through front till a small loop is formed. Using crochet hook chain 50 and fasten off. With needle draw chain through opposite side of hole and then wrap chain around until a little bud forms. Insert the tail into the needle and then draw tail through sides and top of the center, back and forth until bud forms. Secure down so that all sides of bud cannot lift up. See images 17-24

FINISHING

Weave in end. Now hot glue an alligator clip (single or double prong whichever you prefer) to the back of flower. Allow to dry and it’s ready to use.


Halloween inspired Sophia Flower - tutorial w/o pictures

SKILL LEVEL: Beginner/Intermediate

CROCHET HOOK: Size F (to make smaller flower use smaller hook size)

SIZE: One size fits all

With F hook and 1st desired flower color.

Rnd 1: Magic ring

Rnd 2: 10 sc’s in the middle of the circle.  Slst to join. 

Rnd 3: Ch 4, slst in the second crochet loop, *ch 4, skip one stitch , slst in next crochet loop* repeat between *’s around. (5 - ch4 loops made)

Rnd 4: Work the following stitches (sc, hdc, 3dc’s, hdc, sc) all in the first ch4 loop. Repeat between ( ) around. (5 petals made) 

Rnd 5: Ch 5, slst between the first and second petals (see pictures for reference) *ch5, slst between the next two petals* repeat between *’s around. (5 - ch5 loops)

Rnd 6: Join second color. Work the following stitches (sc, hdc, 5dc’s, hdc, sc) all in the first ch5 loop. Repeat between ( ) around. (5 petals made)

Rnd 7: Ch 6, slst between the first and second petals (see pictures for reference) *ch6, slst between the next two petals* repeat between *’s around. (5 - ch6 loops)

Rnd 8: Join third color. Work the following stitches (sc, hdc, 7dc’s, hdc, sc) all in the first ch6 loop. Repeat between ( ) around. (5 petals made) Fasten off leaving about a 36" tail to complete Rnd 9 with. Fasten off and weave in all ends except 36" tail.

Rnd 9: With a large-Eye Blunt Needle weave Rnd 5 tail through flower till center is reached, draw needle through front till a small loop is formed. Using crochet hook chain 50 and fasten off. With needle draw chain through opposite side of hole and then wrap chain around until a little bud forms. Insert the tail into the needle and then draw tail through sides and top of the center, back and forth until bud forms. Secure down so that all sides of bud cannot lift up.

FINISHING

Weave in end. Now hot glue an alligator clip (single or double prong whichever you prefer) to the back of flower. Allow to dry and it’s ready to use.

Happy Crocheting!!!

Crochet Magic Ring or Magic Loop Video Tutorial

Holly PitcherComment
You've heard me talk about the Magic Ring or Magic Loop (whichever you prefer) a lot! I love it! There is just no other way to get such a tight circle to finish off your work that I have found. It's a little confusing to explain so I thought I would just whip up a little video tutorial for you. I hope it helps and please disregard my overly dry hands, lol. I need some lotion stat!!!


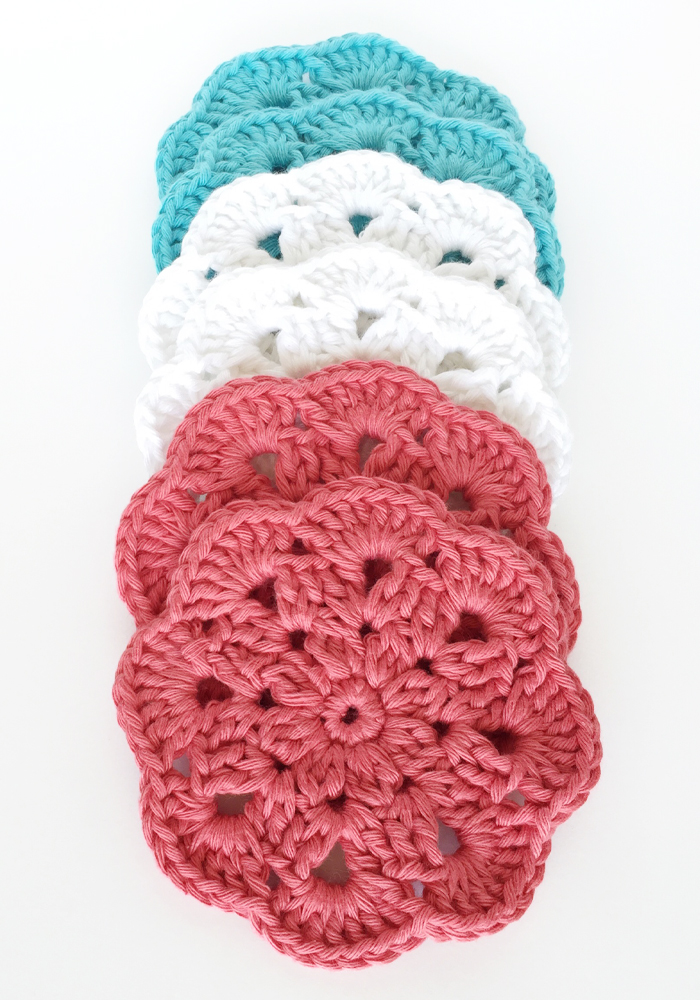
Crochet Flower Coaster Pattern

Holly Pitcher2 Comments
springcoasterpattern

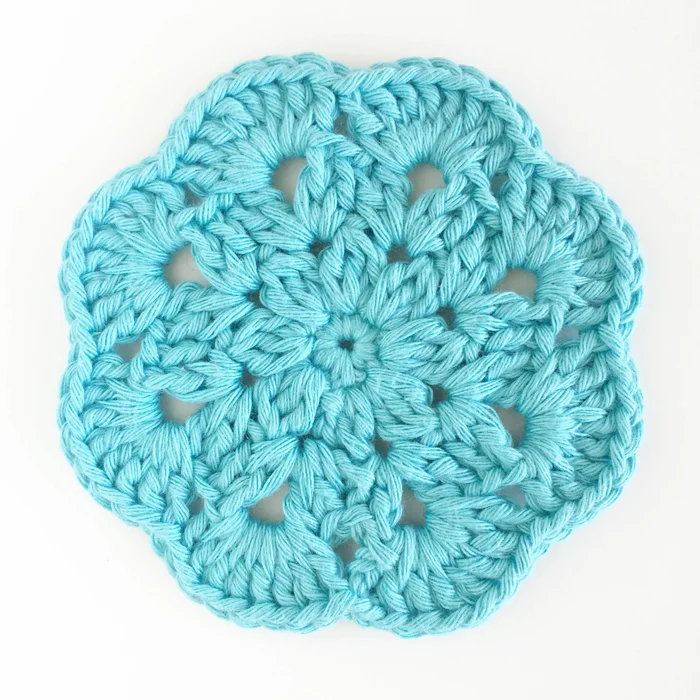
Spring has Sprung Floral Coaster

Materials needed:

F Hook (3.75 MM)

Worsted Weight 100% Cotton Yarn (I prefer Drops Paris)

Abbreviation List:

CH - Chain

SS - Slip 

Stitch

SC - Single Crochet

DC - Double Crochet

DC CL - Double Crochet Cluster

Pattern

First, form a Magic Loop (Video Tutorial here)

Round 1 - CH 1, 7 SC in ring, join with a SS into first SC (total 8 SC). (First picture below)

Round 2 - CH 2, 2 DC CL* in same stitch, *CH 2, 3 DC CL in next stitch*, repeat *to* 6 more times, so you have 8 petals, 

join with SS into first CH 2 of this round.

Round 3 - SS in to next stitch and then SS into CH 2 space. CH 2, 1 DC, CH 2, 

2 DC in the same space, *2 DC, CH 2, 2 DC in the next space*, repeat *to* 6  more times, join with SS

into first CH 2 of this round

.

Round  4 - SS in to next stitch and then SS into CH 2 space from previous round. CH 2, 7 DC in the same space, *8 DC into the next space* , repeat *to* 6 more times, join with SS into first CH 2 of this round and fasten off and weave in ends.

singlefloralcoaster

Pattern without Pictures:

Spring has Sprung Floral Coaster

Materials needed:

F Hook (3.75 MM)

Worsted Weight 100% Cotton Yarn (I prefer Drops Paris)

Abbreviation List:

CH - Chain

SS - Slip 

Stitch

SC - Single Crochet

DC - Double Crochet

DC CL - Double Crochet Cluster

Pattern

First, form a Magic Loop (Video Tutorial here)

Round 1 - CH 1, 7 SC in ring, join with a SS into first SC (total 8 SC). (First picture below)

Round 2 - CH 2, 2 DC CL* in same stitch, *CH 2, 3 DC CL in next stitch*, repeat *to* 6 more times, so you have 8 petals, join with SS into first CH 2 of this round.

Round 3 - SS in to next stitch and then SS into CH 2 space. CH 2, 1 DC, CH 2, 

2 DC in the same space, *2 DC, CH 2, 2 DC in the next space*, repeat *to* 6  more times, join with SS

into first CH 2 of this round

Round  4 - SS in to next stitch and then SS into CH 2 space from previous round. CH 2, 7 DC in the same space, *8 DC into the next space* , repeat *to* 6 more times, join with SS into first CH 2 of this round and fasten off and weave in ends.

*(DC CL: Insert hook, yarn over, pull through 2 loops, insert hook (in the same stitch), yarn over pull through 2 loops, there will be 3 loops on hook, insert hook (still in the same stitch) yarn over, pull through 2 loops, 4 loops on hook, yarn over, pull through all loops.)

Meet the Relief Society - Birthday Celebration

Holly PitcherComment
For the first time in my life I found myself heading up a major event for my ward. The Relief Society Birthday Celebration, yikes! Don't get me wrong I've done a party or two, but nothing at this scale. And to be completely honest its been a few years since I have even attended this event. I was seriously kicking myself for that one. It would have been nice to have an idea of whats been done in the past.


Coming up with the theme seemed the most daunting when I was told "whatever you want will be great". I think that one sentence gives me more anxiety than anything because there is not one once of direction. Maybe its just me, but does anyone else feel that way? Any who, I finally settled on "Meet The Relief Society". After watching Jenna Kim Jones do that very thing on the streets of New York City in Meet the Mormons. I thought how fun it would be to walk around the ward and ask them questions relating to Relief Society. Seriously funny stuff and doing this in my ward yielded the same results. I did, however, ask some serious questions too so I was able to swing things around so that the spirit was felt and hopefully the sisters walked away with a renewed sense of sisterhood.


The questions I asked were:

What year was the Relief Society founded?
Who was the first General Relief Society President?
Can you name the last three Relief Society Presidents of our ward?
What age do you enter Relief Society?
What does "Relief" mean?
What are you most looking forward to when you're in Relief Society?
What does your mom do in Relief Society?
What do we learn about in Relief Society?
and finally, What does Relief Society mean to you?

I asked these questions to the Bishopric, members of the Stake Presidency, the men and women of the ward as well as the youth and primary. I asked three questions per interview and only asked the questions that pertained to who I was asking them to. I used my phone to record them and then ended the video with a short clip called Enduring Legacy. I am no expert, but it turned out, so I'm not complaining. When the film was finished I talked a bit about how we don't need to know all of the answers, what calling we hold doesn't matter, but what does matter is the sisterhood that we are given through Relief Society.

The decor was vintage inspired and my dear friend Emily knocked it our of the ball park. The bird cages were the cutest things ever and you know I was just dying over all of the crocheted doilies!! The paper doilies hanging from the ceiling really pulled everything together.


The food was simple and light and just perfect. we served chicken croissant sandwiches with fruit and veggies and homemade sugar cookies made by the amazing Jamie Scott. I can't believe I didn't get a picture!


And I can't not talking about all the fresh flowers on all of the tables. Smelled divine and made me antsy to get home and get planting.


I must say, I learned a lot and have my list of things that I will definitely need to fix for next time, but I came away with a deeper love for the sisters in my ward. They are so full of love and willing to pitch in when they see this newbie struggling. Oh how I love the sisterhood that is Relief Society!!!


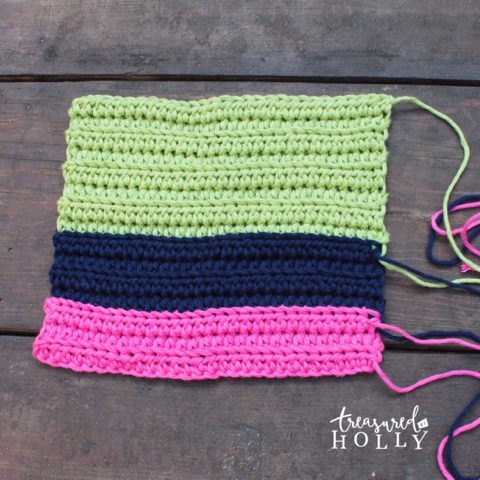
Striped Modern Dishcloth - Free Crochet Pattern

Holly PitcherComment


Crochet Modern Dishcloth Pattern

Materials needed:
I Hook
Worsted Weight Yarn (I prefer  Drops Paris in Navy #28, Lime #39, and Shocking Pink #6)

Abbreviation list:
CH - Chain
HDC - Half Double Crochet

BL - Back Loop

Pattern
Form a slip knot
CH 30
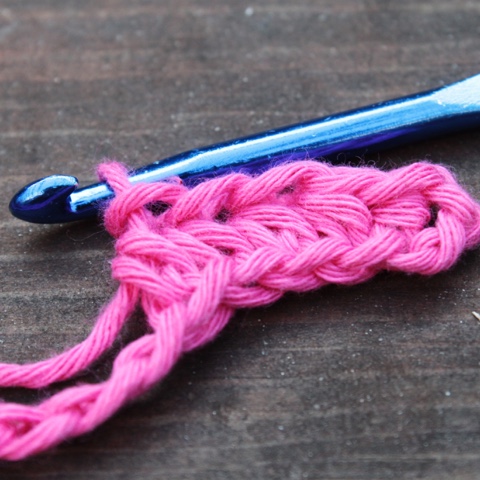
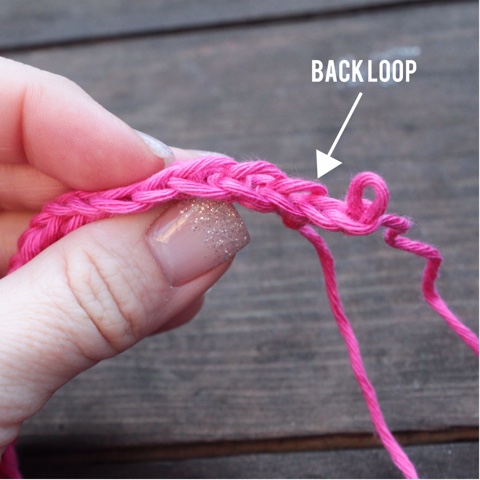
Row 1 - HDC in back (or wrong side of CH) of 3rd CH from hook all the way across for total of 28 stitches. Turn and CH 2


Row 2 - HDC in BL across for 28 stitches. Turn and CH 2. Repeat Row 2 for a total of 14 rows (joining colors at beginning of new row when necessary using chart below)


Row 15 - HDC in BL across for 28 stitches

Fasten off and weave in ends


Stripe Pattern Chart (I start with Pink then Navy ending with Lime):

1st Dishcloth - 
1st color - 3 rows
2nd color - 4 rows
3rd color - 8 rows

2nd Dishcloth - 
1st color - 5 rows
2nd color - 5 rows
3rd color - 5 rows

3rd Dishcloth - 
1st color - 6 rows
2nd color - 5 rows
3rd color - 4 rows


Pattern without pictures:

Crochet Modern Dishcloth Pattern
Materials needed:

I Hook
Worsted Weight Yarn (I prefer  Drops Paris in Navy #28, Lime #39, and Shocking Pink #6)
Abbreviation list:
CH - Chain
HDC - Half Double Crochet

BL - Back Loop

Pattern
First, form a slip knot
CH 30
Row 1 - HDC in back (or wrong side of CH) of 3rd CH from hook all the way across for total of 28 stitches. Turn and CH 2

Row 2 - HDC in BL across for 28 stitches. Turn and CH 2. Repeat Row 2 for a total of 14 rows (joining colors at beginning of new row when necessary using chart below)

Row 15 - HDC in BL across for 28 stitches

Fasten off and weave in ends


Stripe Pattern Chart (I start with Pink then Navy ending with Lime):

1st Dishcloth -
1st color - 3 rows
2nd color - 4 rows
3rd color - 8 rows

2nd Dishcloth - 
1st color - 5 rows
2nd color - 5 rows
3rd color - 5 rows

3rd Dishcloth - 
1st color - 6 rows
2nd color - 5 rows
3rd color - 4 rows