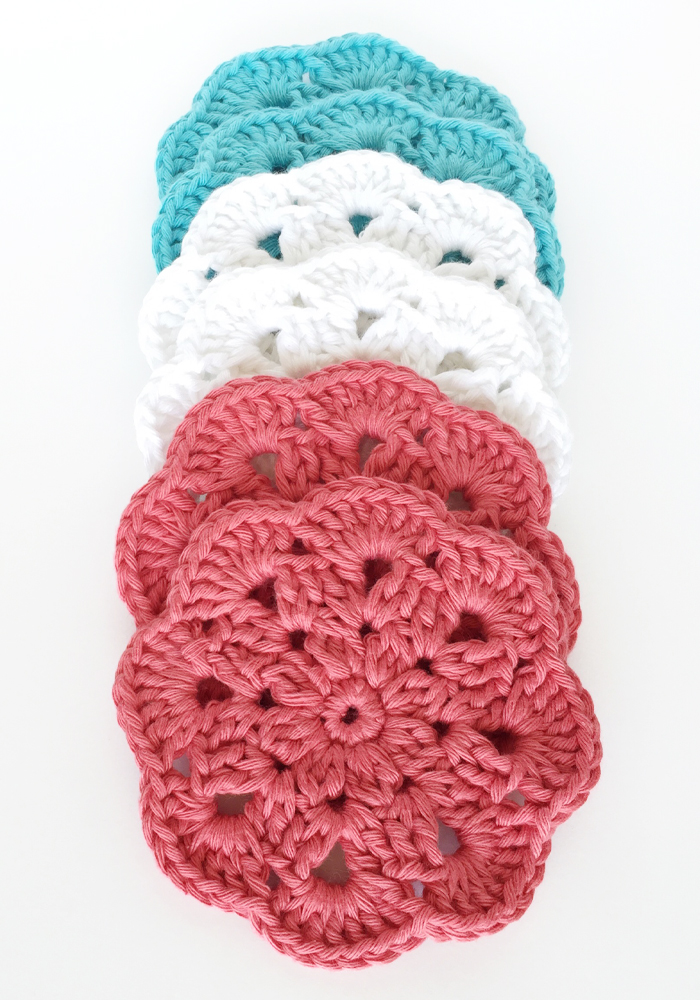
I can't believe that Halloween is almost upon us. Seriously, where does the time go? I must say, however, that this is one of my most favorite holidays for so many reasons. One being the candy, of course. The other, all the fun parties throughout the month. When my girls were younger (and will still let me do whatever I wanted with their hair and clothes) I would buy fun Halloween shirts and make hair accessories to match.

Isn't she the cutest!! She was only 4 in this picture and oh how I miss her sweet little voice. Now she's 10 1/2 and so full of wonderful energy. I just love her. Here's wishing you a haunting halloween and have fun with this little flower!
Pattern
SKILL LEVEL: Beginner/Intermediate
CROCHET HOOK: Size F Boye crochet hook (to make smaller flower use smaller hook size)
SIZE: One size fits all
With F hook and 1st desired flower color.
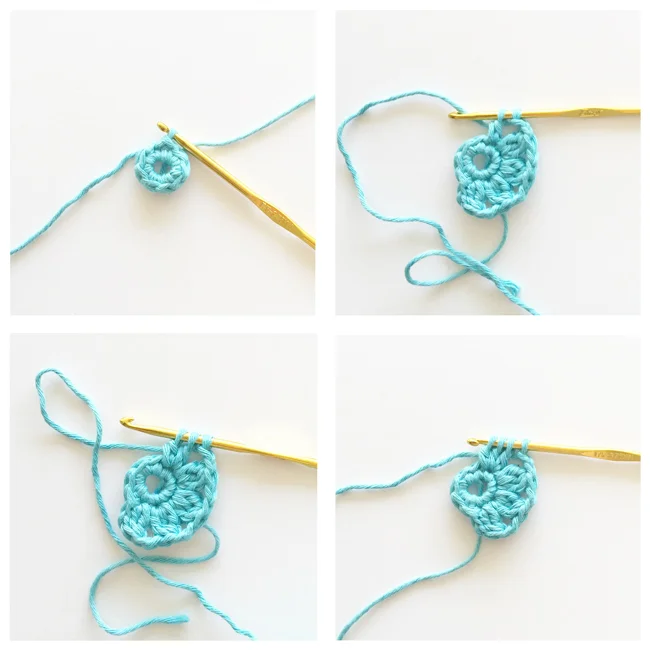
Rnd 1: Magic ring
Rnd 2: 10 sc’s in the middle of the circle. Slst to join. See image 1
Rnd 3: Ch 4, slst in the second crochet loop, *ch 4, skip one stitch , slst in next crochet loop* repeat between *’s around. (5 - ch4 loops made) See image 2
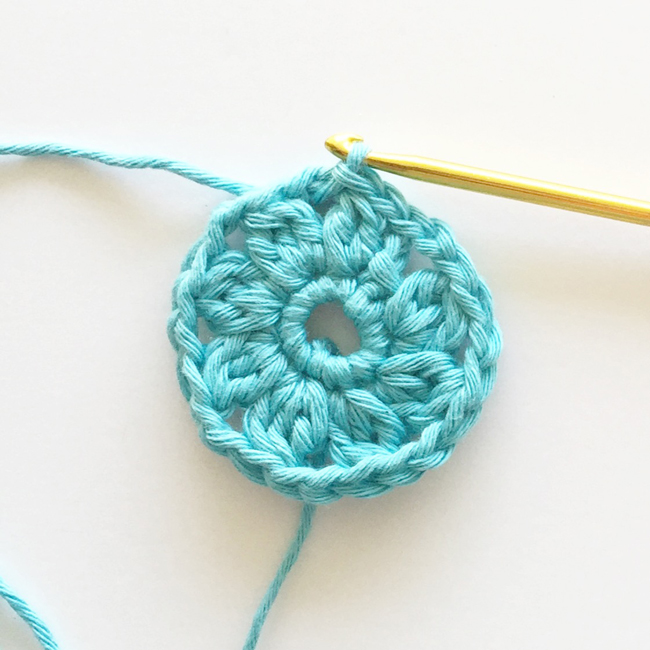
Rnd 4: Work the following stitches (sc, hdc, 3dc’s, hdc, sc) all in the first ch4 loop. Repeat between ( ) around. (5 petals made) See image 3
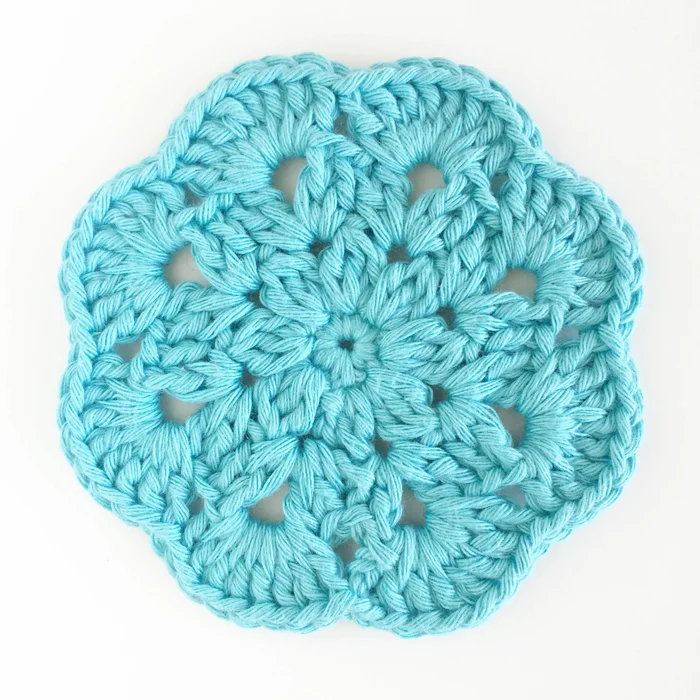
Rnd 5: Ch 5, slst between the first and second petals (see pictures for reference) *ch5, slst between the next two petals* repeat between *’s around. (5 - ch5 loops) See image 4
Rnd 6: Join second color into first ch5 loop. See image 4. Work the following stitches (sc, hdc, 5dc’s, hdc, sc) all in the first ch5 loop. Repeat between ( ) around. (5 petals made) See images 5-7
Rnd 7: Ch 6, slst between the first and second petals (see pictures for reference) *ch6, slst between the next two petals* repeat between *’s around. (5 - ch6 loops) See image 8
Rnd 8: Join third color into 1st ch6 loop. Work the following stitches (sc, hdc, 7dc’s, hdc, sc) all in the first ch6 loop. Repeat between ( ) around. (5 petals made) Fasten off leaving about a 36" tail to complete Rnd 9 with. Fasten off and weave in all ends except 36" tail. See images 9-16
Rnd 9: With a large-Eye Blunt Needle weave Rnd 5 tail through flower till center is reached, draw needle through front till a small loop is formed. Using crochet hook chain 50 and fasten off. With needle draw chain through opposite side of hole and then wrap chain around until a little bud forms. Insert the tail into the needle and then draw tail through sides and top of the center, back and forth until bud forms. Secure down so that all sides of bud cannot lift up. See images 17-24
FINISHING
Weave in end. Now hot glue an alligator clip (single or double prong whichever you prefer) to the back of flower. Allow to dry and it’s ready to use.
Halloween inspired Sophia Flower - tutorial w/o pictures
SKILL LEVEL: Beginner/Intermediate
CROCHET HOOK: Size F (to make smaller flower use smaller hook size)
SIZE: One size fits all
With F hook and 1st desired flower color.
Rnd 1: Magic ring
Rnd 2: 10 sc’s in the middle of the circle. Slst to join.
Rnd 3: Ch 4, slst in the second crochet loop, *ch 4, skip one stitch , slst in next crochet loop* repeat between *’s around. (5 - ch4 loops made)
Rnd 4: Work the following stitches (sc, hdc, 3dc’s, hdc, sc) all in the first ch4 loop. Repeat between ( ) around. (5 petals made)
Rnd 5: Ch 5, slst between the first and second petals (see pictures for reference) *ch5, slst between the next two petals* repeat between *’s around. (5 - ch5 loops)
Rnd 6: Join second color. Work the following stitches (sc, hdc, 5dc’s, hdc, sc) all in the first ch5 loop. Repeat between ( ) around. (5 petals made)
Rnd 7: Ch 6, slst between the first and second petals (see pictures for reference) *ch6, slst between the next two petals* repeat between *’s around. (5 - ch6 loops)
Rnd 8: Join third color. Work the following stitches (sc, hdc, 7dc’s, hdc, sc) all in the first ch6 loop. Repeat between ( ) around. (5 petals made) Fasten off leaving about a 36" tail to complete Rnd 9 with. Fasten off and weave in all ends except 36" tail.
Rnd 9: With a large-Eye Blunt Needle weave Rnd 5 tail through flower till center is reached, draw needle through front till a small loop is formed. Using crochet hook chain 50 and fasten off. With needle draw chain through opposite side of hole and then wrap chain around until a little bud forms. Insert the tail into the needle and then draw tail through sides and top of the center, back and forth until bud forms. Secure down so that all sides of bud cannot lift up.
FINISHING
Weave in end. Now hot glue an alligator clip (single or double prong whichever you prefer) to the back of flower. Allow to dry and it’s ready to use.
Happy Crocheting!!!